Friday, January 15, 2016

A surprise tutorial - Believe in yourself purse

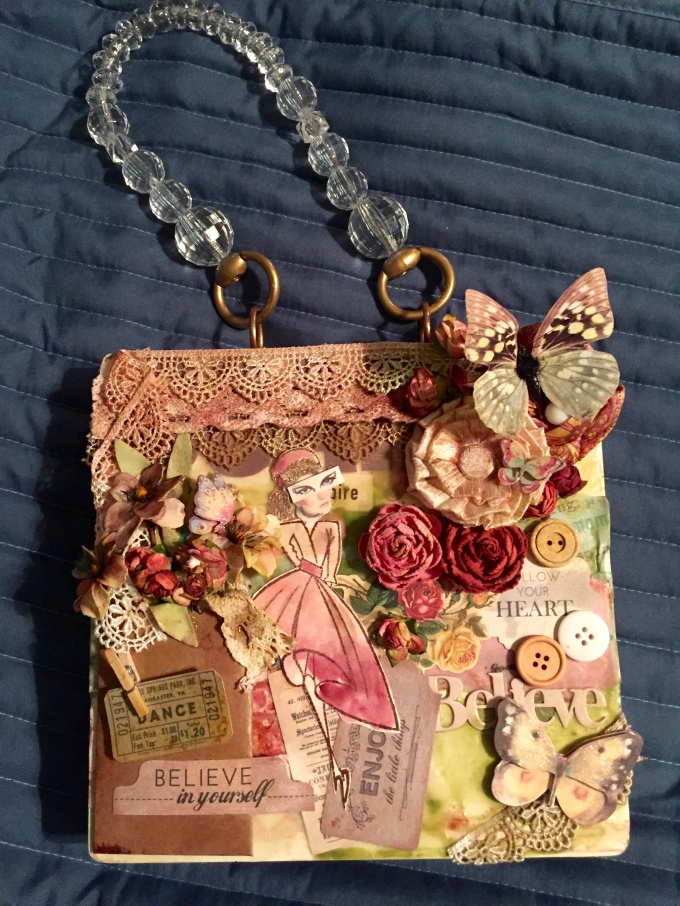
I decided to take a break from creating layouts to create something a little more fun and three dimensional.  I had this old wood box that I collaged years ago and covered in beeswax.  I decided to give it a makeover and this is what I came up with.
IMG_2179IMG_2180IMG_2182
Supplies
  • Tim Holtz ideaology - ring binder
  • Tim Holtz ideaology - ephemera pack - emporium
  • Ranger Distress spray - fossilized amber
  • Art-c - ephemera collage kit
  • Paper Studio (Hobby Lobby brand) spare parts - Pink vintage fabric flower, pinks paper flower assortment
  • My Garden Friends (Hobby Lobby) - butterflies
  • K & Co - layered butterfly accents
  • Faber Castel gel medium
  • Scotch tacky glue
  • Faric glue
  • Tacky tape
  • foam tape
  • Dylusions mini couture stamp
  • Ranger Distress Inks
  • 7 gypsies color wash
  • assorted small silk flowers
  • purse handle
  • gold paint
  • electric drill
Unfortunately I didn't take photos during the process so I'll walk you through some of the more interesting techniques.
I started off with the little envelope on the left.  I knew I wanted stuff growing out of it so I tucked in some lace and flowers.  The flowers I had were cream colored so I hand painted them to  match my other elements using distress paints.  This is super easy and looks great.  Create a palette on a craft mat using several coordinating distress inks.  I believe I used mahogany,  worn lipstick and tea dye.  Just rub a little on the mat then use a water brush to paint with it.  Use as much or as little water as you need to achieve the desired effect.
I then added a bunch of collage elements to hide the old stuff . I used gel medium to stick everything down.
I think my favorite element is the stamped woman.  I used a dylusions stamp which is headless with archival ink so it wouldn't smudge. I painted the dress and hat using the same technique and colors as the flowers. The head and eye are free images that I found on the internet.  I Layered them and added them to my project using gel medium.
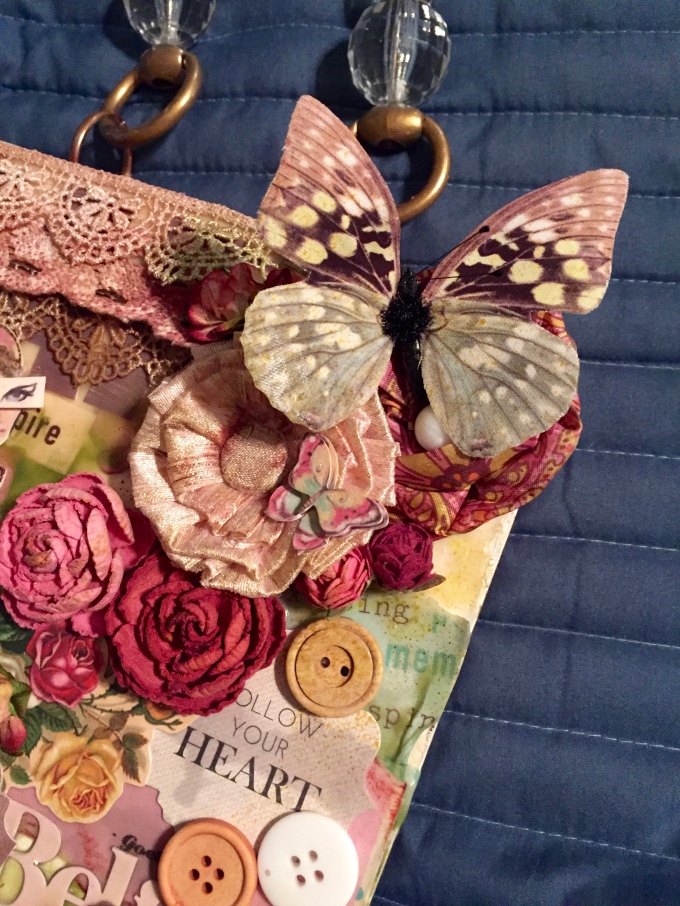
The strips of lace are from the ephemera kits.  I aged them using a combination of watered distress inks and color wash.  They are stuck down with  tacky tape.  I left the top one long so I could fold it onto itself and have it cascade down to the pocket.  I stuck it down where it folds with fabric glue.  Next time I may use hot glue because it took forever to dry.
Next I collaged the larger elements, sticking them down with tacky glue.  I think hot glue would have worked better here also. The butterfly is on a wire so I just wrapped it around the center of the flower.  I added a few spritz of distress spray to give everything a more uniform color.
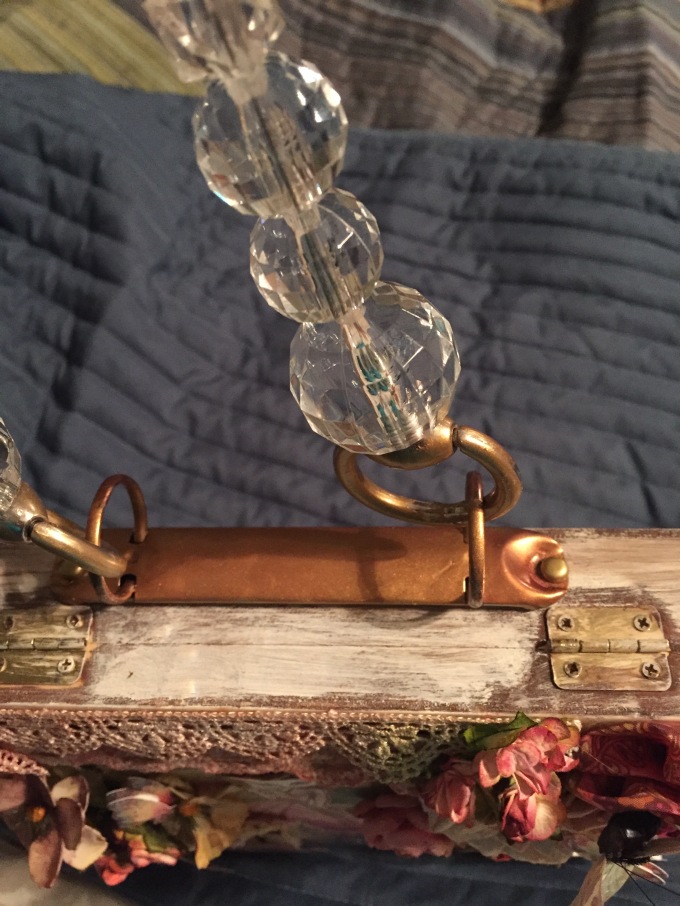
Finally for the handle I used a Tim Holtz ideology ring binder and a pre made purse handle from the craft store.  The fittings were originally silver which didn't really go with my project so I spray painted them gold.  I drilled holes in the top and used brads to attach the ring binder.
Voila...project completed.  Please leave me comments and let me know what you think.  If this inspires any of your own projects post a picture in the comments.  Thank you so much!

This is a wonderful tutorial from the amazing Lily.
We hope this will inspire you to create!


On the sidenote: Keep in mind to use up your stash. And if a tutorial is mixed media, you can create a scrapbook page ofcourse. It is all about your interpretation about a tutorial. This is the question I get a lot.

Get inspired, learn and create whatever you want. It is your style that makes it your story.
Thank you.

Emine Pazan-Pala
Founder Scrapmixers

Thursday, January 14, 2016

Season (winter clock) secret contest project #2 of #3

Our amazing designer came up with this awesome tutorial. 
This is the second project. Due date 31 januari to finish all the project. 

This is an alarm clock. Wonderfull project. 

The name of this project is Winter. What is your favorite season or your favorite colors. Choose them both to create this amazing project by Nanette Bourdeu. 

Project #2 (please check out our first project)

I made this faux alarm clock out of a tuna can after seeing them made on YouTube.  I posted this on the 1st and have since learned many tricks that would have made it better/easier but none that would save my fingers from hot glue :)  So here we go but bear in mind use what you have on hand! (Remember: use up your stash).

This project requires nothing set in stone but a can of some sort that fits the form of it.  Everything else can be made from things you have in your stash, I know this!

Step 1.
Paint the outside of the can in colors of your choice.  I choose a green because it was the only metal paint I had but any acrylic paint will work.  Then splatter on some white, silver, gold, blue, whatever makes your heart sing while you splatter!


Step 2.  
Paint the inside of your can to coordinate with your paper or background you have chosen (look through your stash). I added salt to mine while it was wet for some texture as I was wanting a snowy scene.


Step 3.
Put some feet on it!  Beads, scrabble tiles, whatever you have that will hold up the front and then I added a scrabble tile on the back of the original one and a little Winter bling thing on the back of this one worked just fine.  I stacked beads on the first and used just one large pearl for this one.  Proves anything can work that you have in your stash!


Step 4.
Start on the top.  For both of mine I used some things that have a name that I cannot recall that my Mom gave to me years ago.  But I have seen bottle caps used either single or two together on each side and it looks awesome!  My bottle caps were hiding when I looked for them so I went with the same thingys.  Glue a bead down to raise them up and then glue them on top.  Use what you have.


Step 5.
For the first one I took a pipe cleaner and wrapped ribbon around it.  This one I found a piece of soda can I had run through the embossing machine for something so decided to cut out the shape of the top wire.  I could still wrap it with ribbon if I wanted to or refine the shape a bit or use an actual piece of wire for it. It doesn't show up too well against the table covering on the pic, sorry!


Step 6. 
Assemble all your embellishments for the inside (look through your stash).  I used a die cut on some pretty blue background paper, a deer, a small tree, and lots of glitter!  You can use virtually anything to make your scene.  A digital or stamped image cut out on some cereal box cardboard to help it stand up and build around that.  Your backing paper can lead you into a scene if you don't have an idea before you start.  Then I added the outside embellishments....be careful hot glue will burn your poor fingers!


Hope this helps you get your imagination running!

And now remember this is part of our pre-first challenge at Scrapmixers, a brand new challenge with a brand new concept so check out the link and find out how to enter really easy just do one of three projects (this is one of them) and put in the comment section of the challenge post.  Easy Peasy so give the blog a read and get excited to be a Scrapmixer with us! 

Thank you Nannette Bourdeu for this amazing tutorial and project. 

Founder Scrapmixing


Wednesday, January 13, 2016

Scrapmixers concept secret contest #1 Mixed Media Canvas

Hi dear scrapmixers,

It is time for a secret contest before we start on monday 1st february.

We are proud to announce our first video tutorial.

There will be 3 projects, it is on you how you interpret them. Just try to fit our concept and finish at least 2 projects to be in the drawing.

Our #1 st project is this amazing mixed media canvas tutorial from our talented scrapmix designer Aya.

She used for this project: Martha Stewart Crafts Scoring board and envelope tool and Webster Pages Paper collection and Prima Marketing ink. Ofourse you can use any product you like.
Our concept is also about using your stash and this project fit's that perfectly.

Create this project and post the link in the comment section.

We are excited to see what you come up with.

The topic of this project is: Dream. A girls dream is to get married. But what is your dream? Everyone has a dream. It could be your childhood dream. It is all up to you. Scrap about this theme: your dream if anything in the world would be possible, what would you do etc.

Make this project your own and use up your stash.

And ofcourse we will give a prize package (which will be a suprise) ofcourse.

Have fun while creating about your dream this amazing project. Remember there is no good or wrong. While creating you will be scrapmixing.

I posted this on our new facebook:

Scrapmixers brand new facebooksite.

Hi Scrapmixers, when I first came up with the idea it grew like a tree. Now we will start february first. But we now have a contest in the scrapmixing concept. use up your stash if you like, what is your dream if money/health or something else was not an option.
Create this project by the amazing Aya. She is good in her job as a scrapmixer and video tutorials. We have uploaded the information and the video on our blog. we have an amazing suprise prize package. Remember to enjoy while creating and be aware what kind of effect it has to you while you are creating about your dream. Does it make you sad, happy, enthousiastic. Share it with us. What are your dreams? I know that art and scrapmixing, helping people is my passion. my dream is to make this a big succes and write a book about it. And I will participate too ofcourse. How couldn't I. Share your dreams. and we are here to answer all of your questions.

Please don't be afraid. Your art is your personal art. doesn't matter how you call it. it is your way of dealing with the everyday life and express yourself creatively.
Hop on to the blog and enjoy every second. this tutorial is a must see and must do kind.
Can't wait to hear about your dreams and see your creations.
You are all scrapmix designers.
http://scrapmixers.blogspot.nl/…/scrapmixers-concept-secret…


Be aware that you are working on yourself while creating and to have fun ofcourse. 

Have an amazing day, 

and the team
Founder concept scrapmixing


Tuesday, January 12, 2016

ARE YOU READY?? SURPRISE CONTEST

  1. The contest starts tomorrow. Only rule we have is that you finish at least 2 project, upload it here or  somewhere else and put the links here. That's it, you have entered. 
  2. The winner will win A BEAUTIFUL prize package. 
  3. Have a lot of fun..... be a scrapmixer, free and creative. 

Are you in Tomorrow?
Or do you want us to start today? LOL.
We can't wait to share.

The first video-tutorial will be this mixed media Canvas. ARE YOU IN? SPREAD THE WORD.


The more the better.

Details will come up when you are NOT expecting.

You know what?

I want to start a little contest already.

1) Share this contest with your friends.
2) Let them comment on this topic with your name
3) The person who's name come up the most will win a little surprise.

Go and spread the world. 1, 2, 3 ..... GOOOOOO

Monday, January 11, 2016

CONTEST BEFORE WE START


Hi Scrapmixers,

You need to keep checking this site.

We have a CONTEST soon. 

Our designers are working. To start off we are doing a contest. 4/5 projects with tutorials. The rules are, create at least 3 of the projects, post them on your blog or gallery, add the link in that post and you make chance to win the grand prize.

Please keep on checking here. We are not going to say when it will start. You will need to check this site on a regular basis. 
Let's start having fun!!!!


Handtekening
 Founder Scrapmixer concept

OUR DESIGNTEAM

Hi you all,

We have selected the designteam. Thanks you for aplying. If you are not been selected, that doesn't mean that you are not a SCRAPMIXER. Because you ARE.

OUR SCRAPMIXERS DESIGNTEAM:

Scrapbook/card challenge group:  (every 1st and 3th monday)

Cathy Sanders (coördinator Challenge group)
Emily Grant
Tynke de Groot
Denyse Bédard
Aya Alsheshtawy
Karin Mosbarger
Alicia Mia Falu
Astrid de Beer-Logtenberg

Art Journal/Mixed Media challenge group: (every 2nd and 4th monday)
Lillian Goldsmith (coördinator Art Journal/Mixed media group)
Katie Lamb
Nan Bourdeu
Kim

Video tutorials: (every 5th monday)
Aya Alsheshtawy

Congratulations girls.

We are going to start our first challenge on Monday 1th February 2016.
Hope to see you then. In the meantime keep creating and sharing this wonderful concept.

We are all scrapmixers.

See you the first or we might have suprise posts with wonderfull prizes. Follow us, so you won't miss it.

Have a blessed and creative day,

Handtekening
Emine Pala
Founder Scrapmixing


Saturday, January 2, 2016

WHAT IS SCRAPMIXING??

What is scrapmixing:

Scrapmixing is a whole new concept I came up with. It's like art Therapy with the focus on scapbooking and mixed media. It's is a movement.

There is No good or wrong, to be unique by sharing your story. The good and the bad ones. About your feelings.

It's all about challenging yourself to push yourself to be creative in a way you never knew you could. It's not just about designing it's a creative therapy. To change your life for the better and not by telling your story as expected but sharing your story and helping yourself and others.

There will be a lot of challenges, tutorials and life stories. Making the world a better place. Everything begins with just one tiny step. Learn yourself and change your life just by scrapmixing.

Scrapbooking connects people all around the globe. You are not alone. You are as creative, succesfull as you wish. It is not being on a designteam, money or anything other then YOU.

Are you in to change your life by sharing your story. Eventhough how hard life can get but you still have the energy to create, to love, to share and to help yourself and others by becoming your better version?

We would love to have you on the team.

Have a blessed day

Handtekening